Updating Composer in Travis

If you're using Composer in Travis, it's a good idea to update Composer before each build. If you do not update, you may receive warnings like the following.

Warning: This development build of composer is over 30 days old. It is recommended to update it by running "/home/travis/.phpenv/versions/5.4.13/bin/composer.phar self-update" to get the latest version.

It seems the Travis environment isn't completely reset between builds and jobs. Tests should always be ran using the latest version of Composer, so place a selfupdate in before_script.

before_script:
  - composer selfupdate
  - composer install

Amazon S3 testing in Travis CI

I recently started integrating Travis CI into some of my projects. Travis is a continuous integration service that will execute your test cases in multiple different environments. I've been putting off integrating Transit into Travis because of Amazon S3 testing, but I found the time to dig into it and implement it successfully.

Preparing S3

To integrate S3 into Travis, the AWS environment must be prepared. This section can get quite lengthy and complicated, but I will keep it brief and simply. The first step is to create a new bucket and apply a lifecycle rule of 1 day to the entire bucket. This rule will delete all files in the bucket every 24 hours, which in turn requires no maintenance, cleanup and low costs on our end.

The next step is to create a new IAM group and assign the "Amazon S3 Full Access" policy permission. Once created, we need to modify the policy and change the permissions. I used the following policy for testing, which allows full S3 access to the ci-testing bucket.

{
	"Statement": [
		{
			"Effect": "Allow",
			"Action": "s3:*",
			"Resource": "arn:aws:s3:::ci-testing/*"
		}
	]
}

After the group is setup, create a new user and assign it to the group. Be sure to save/store the credentials (access and secret key) of the user as we will need them later on. It's also a good idea to set/generate a password for this user.

Integrating Travis

To make use of S3 in Travis, the appropriate variables must be set in the environment. This can be accomplished using the env:global: setting in the .travis.yml file. The region and bucket can be set using plain text.

env:
  global:
    - AWS_S3_REGION="us-east-1"
    - AWS_S3_BUCKET="ci-testing"

Like any smart developer, the access and secret keys should not be set using plain text, as this would give S3 access to anyone viewing the Travis logs. However, we can still set the private keys using encryption keys. This process requires Ruby and RubyGems to be installed (either with Cygwin, Homebrew or another package manager).

Installing RubyGems on Cygwin is rather easy. Simply download the zip and extract it to the C:/cygwin/home/ directory. Once extracted, run the following command from within the extracted folder (this requires ruby to be installed via the Cygwin setup).

ruby setup.rb

Once installed, install Travis.

gem install travis

Then use the encrypt command coupled with the -r flag (repository) to generate a secure environment key. In the example, I will be using my Transit repository.

travis encrypt -r milesj/Transit AWS_S3_KEY="<access_key>"

Add the encrypted string to the .travis.yml file. Do the process again for the secret key.

travis encrypt -r milesj/Transit AWS_S3_SECRET="<secret_key>"

The file should now look like the following:

env:
  global:
    - AWS_S3_REGION="us-east-1"
    - AWS_S3_BUCKET="ci-testing"
    - secure: "<encrypted_access_key>"
    - secure: "<encrypted_secret_key>"

These environment variables can now be accessed from the $_SERVER global within the test cases. For a full implemented example, check out my Transit library.

Repository Cleanup

I'm currently in the mood to cleanup all my Github repositories, and with this will come some changes. I am posting this to give a warning to anyone who is cloning my repositories either directly or via submodule, as some of the repository names (and URLs) will change. This overhaul is meant to free up some of my time as I plan to veer away from starting any new projects (unless it's part of a client request) and merely want to support my current projects with bug fixes and new features, if any. With this change, the following changes are happening:

The following projects will have their names changed:

  • php-decoda --> Decoda
  • php-transit --> Transit
  • php-packager --> Packager
  • cakephp-utility --> Utility
  • cakephp-forum --> Forum
  • cakephp-uploader --> Uploader
  • moo-decoda --> Decoda.js

The following projects will be deprecated and no longer receive any kind of support:

  • cake-decoda
  • cake-ajax_handler
  • cake-auto_login
  • cake-cache_kill
  • cake-feeds
  • cake-spam_blocker
  • cake-redirect_route
  • cake-we_game
  • php-type_converter
  • php-statsburner

Most of the deprecated projects were moved to the Utility plugin or the Titon project and will continue to receive support there. The stand alone projects are merely deprecated.

The following projects will no longer be supported excluding critical bugs:

  • php-compression
  • php-resession
  • php-numword
  • php-gears
  • php-formation
  • php-databasic

Thanks for all your continuing support and sorry if these minor changes cause any hiccups. Please be patient and give Github and Composer some time to propagate the changes.

Naming your cache keys

Everyone caches, that's a pretty well known fact. However, the problem I always seemed to have was how to properly name my cache keys. After much trial and tribulation, I believe I have found a great way to properly name cache keys. To make things easy, my keys usually follow this format.

<model|table>__<function|method>[-<params>]

To clear up some confusion, it goes as follows. The first word of your cache key should be your model name (or database table name), as most cached data relates to a database query result. The model name is followed by a double underscore, which is then followed by the function/method name (which helps to identify exactly where the cache is set), which is then followed by multiple parameters (optional). Here's a quick example:

public function getUserProfile($id) {
	$cacheKey = __CLASS__ .'__'. __FUNCTION__ .'-'. $id;
	// Check the cache or query the database
	// Cache the query result with the key
	// Return the result
}

The $cacheKey above would become: User__getUserProfile-1337, assuming the user's ID is 1337. Pretty easy right? Besides the verbosity that it takes to write these constants, it works rather well (unless you want to write the method and class manually). You may also have noticed that I used __FUNCTION__ over __METHOD__ -- this was on purpose. The main reasoning is that __METHOD__ returns the class and method name, like User::getUserProfile, while __FUNCTION__ just returns the method name.

The example above will work in most cases, but there are other cases where something more creative is needed. The main difficulty is how to deal with array'd options. There are a few ways of dealing with that, the first is checking to see if an ID or limit is present, if so, use that as the unique value. If none of the options in the array are unique, you can implode/serialize the array and run an md5() on the string to create a unique value.

User::getTotalActive();
// User__getTotalActive
Topic::getPopularTopics($limit);
// Topic__getPopularTopics-15
Forum::getLatestActivity($id, $limit);
// Forum__getLatestActivity-1-15
Post::getAllByUser(array('user_id' => $user_id, 'limit' => $limit));
// Post__getAllByUser-1-15
User::searchUsers(array('orderBy' => 'username', 'orderDir' => 'DESC'));
// User__searchUsers-fcff339541b2240017e8d8b697b50f8b

In most cases an ID or query limit can be used as a unique identifier. If you have another way that you name your cache keys or an example where creating the key can be difficult, be sure to tell us about it!

Converting a SimpleXML object to an array

This functionality can now be found within the Titon Utility library.

If you have been following my Twitter, you would of heard me complaining about converting a SimpleXML object into an array. I am still having that problem, so if you can get it working correctly (my test so far below), I would be greatly appreciative. If you have never used the SimpleXML object, it can be quite awesome when actually reading an XML document - but once it comes to converting it to something else, it comes straight from the darkest depths of hell. Every property of the object, is also a SimpleXML object, so on and so forth. Each property/object has a method children(), which returns more properties, or attributes() which returns attributes; weirdly enough, children() also return attributes. Furthermore, you can't just echo the object out to get a value, you have to turn it into a string. You can see where this can get quite difficult and confusing, as it always spits out data your not expecting.

After countless hours, I was able to get it to properly convert to an array... about 95% of the time... while keeping attributes and parent/children hierarchy. The only scenario where it doesn't convert properly, is when you have nodes within a node that has attributes (which is kind of rare in my opinion). Here's a small little example:

// Works just fine
<root>
	<node foo="bar">I'm a node!</node>
</root>
// Does not work
<root>
	<node foo="bar">
		<childNode>I'm here to make your life miserable!</childNode>
		<childNode>Me too!</childNode>
	</node>
</root>

Besides that little instance, I am able to properly turn an XML document with attributes, and multiple nodes with the same name, all into a perfectly replicated array. Here is the code I wrote to achieve such an amazing task (sarcasm).

/**
 * Convert a SimpleXML object into an array (last resort).
 *
 * @access public
 * @param object $xml
 * @param boolean $root - Should we append the root node into the array
 * @return array
 */
public function xmlToArray($xml, $root = true) {
	if (!$xml->children()) {
		return (string)$xml;
	}
	$array = array();
	foreach ($xml->children() as $element => $node) {
		$totalElement = count($xml->{$element});
		if (!isset($array[$element])) {
			$array[$element] = "";
		}
		// Has attributes
		if ($attributes = $node->attributes()) {
			$data = array(
				'attributes' => array(),
				'value' => (count($node) > 0) ? xmlToArray($node, false) : (string)$node
				// 'value' => (string)$node (old code)
			);
			foreach ($attributes as $attr => $value) {
				$data['attributes'][$attr] = (string)$value;
			}
			if ($totalElement > 1) {
				$array[$element][] = $data;
			} else {
				$array[$element] = $data;
			}
		// Just a value
		} else {
			if ($totalElement > 1) {
				$array[$element][] = xmlToArray($node, false);
			} else {
				$array[$element] = xmlToArray($node, false);
			}
		}
	}
	if ($root) {
		return array($xml->getName() => $array);
	} else {
		return $array;
	}
}

I know exactly where the problem resides also. Its the value index of the $data array. (The little bastard below).

$data = array('attributes' => array(), 'value' => (string)$node);
// Should be
$data = array('attributes' => array(), 'value' => xmlToArray($node, false));

A simple fix right? Nope! When you do that, it totally breaks... for some reason. The first line of the function (!$xml->children()) gets passed since the element passed does have children, since it has attributes; now I can never understand why attributes count as children when you have attributes(). I tried many different conditionals to get it working, I tried unsetting the attributes (but can't determine the property), and all these other routes... but to no avail. But I digress, seeing as how it works 95% of the time, and the case it doesn't work isn't used that much. However, if you can figure it out, I will be in your debt forever.

The fate of class suffixes in 5.3

Before PHP 5.3 was released, many programmers would suffix their classnames with the package and or module that it pertains to. For example, SessionHelper, UsersController, CommentModel, so on and so forth. But with the recent upgrade to namespaces, are these types of suffixes still required?

// Current Practice
SessionHelper();
// Namespace Practice
\app\libs\helpers\Session();
// Redundant Practice
\app\libs\helpers\SessionHelper();

That's one of many dilemma's I am running into right now when dealing with past practices and theories, and applying them to newer code. Namespaces make the suffix redundant as the package is now part of the class name (unless you are aliasing the namespace). The only deal breaking reason I can think of right now as to keep suffixes; is when you are editing multiple files (or browsing a folder), as it helps identify files from each other. But on the other hand, how many times are you going to have multiple files opened name User? Maybe twice for the model and controller.

I'm mainly posting this entry to get input from everyone else and what you think the approach should be. Right now I'm going down the path of not suffixing my classes, as the similar file name is not that much of a problem or hindrance to me. If you have any convincing arguments, let me hear them (especially since this will apply to my newer scripts)!

GitHub, my new home

As I mentioned in my previous posts, I took the jump and moved over to GitHub. I moved over to a public repository system to make it easier on me pushing my code changes to the public (the current download system on my site isn't too intuitive). So over the past few weeks I have been slowly adding all my scripts to GitHub and pushing the code. Additionally, I have been uploading the old zipped versions of the scripts, which can be found on the respective repo's downloads page. I would of done and SVN import into Git, but it kept stalling every time I did so, oh well!

With the move to GitHub, I have updated all the download links and buttons on the site. It either asks you to download the files, or clone the repo (both of which will bring you to do the GitHub page). I do miss my download counter though... I really wish GitHub had a total downloads/clones feature.

Anyways, you can find my GitHub at the user milesj. I will be pushing all my changes and code here from now on using Git, but will still keep updating the change log on this site, and posting announcements about it. Now get to cloning!

Installing GitExtensions for Windows

I have been trying to get into Git for a while now, but with its lack (or terrible) support on Windows, I ignored it. I tried doing the stand alone CLI, but I don't like CLI, so I abandoned it. I tried using TortoiseGit, but wasn't too fond of still trying to get SHH or Putty integrated nicely. I want something that does it all for me, without me having to configure or do anything (or maybe I just completely did it wrong, or was using an old build). Along came GitExtensions in all its glory. It came packaged with everything I needed: Putty/SSH integration, repository management, GitHub support (remote features), and all the other awesome minor features. I mean it even has a CLI, if I ever wanted to use it.

The installation process was straight forward and painless. I will run you through the installation process and how to get GitExtensions working on Windows. Once done, you should be ready to dive into Git head on. I took the time to add screenshots of the installation process to aide you on.

Downloading

Well the first step of course is downloading the program. You can download it from the projects page. Personally I would go with the full installer (MSysGit, KDiff3 and PuTTy built in), so that you do not have to do all those separately yourself. Once downloaded, just execute the file and follow the steps.

Installation

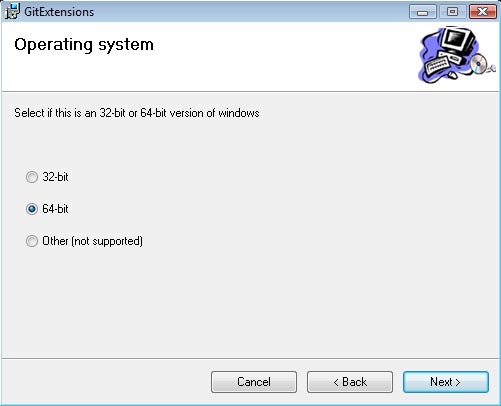
Its important that you go through the installer slowly, and select your proper configuration. For example, I am on a 64-bit computer, so I will be choosing the 64-bit option.

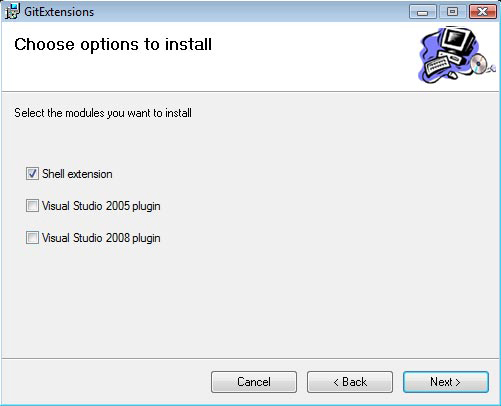
You should next be asked where to store the files, I kept them in its default location within the "Program Files". On the next screen it gives you a list of checkboxes for "Shell Extension" and "Visual Studio". If you are not going to be using the Visual Studio integration, do not check these boxes, however Shell Extension should be checked.

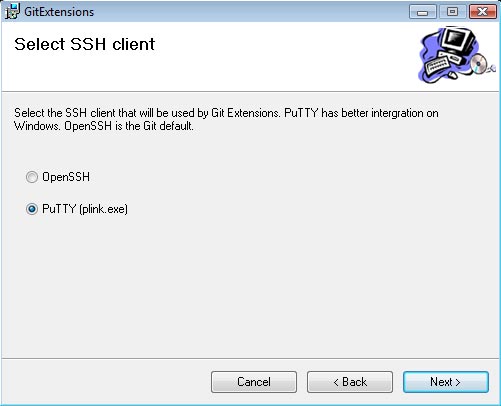
The next setting should be for your SSH support. Personally I have always used PuTTy, so I went with PuTTy (and the integration works perfect so far). If you are a fan of OpenSSH, then by all means go with what your comfortable and use to.

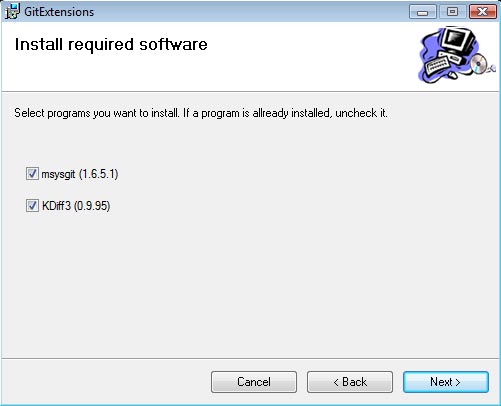
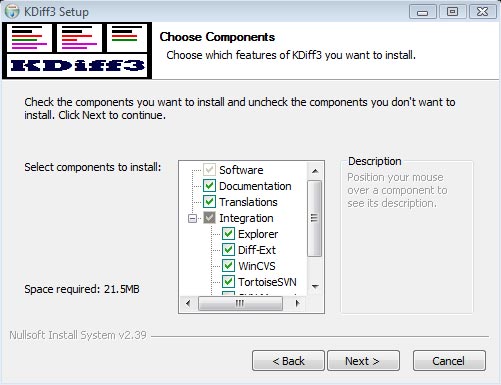
The final screen should be a list of required components to install. MSysGit is the base of Git, so make sure that it is checked off (if you already have it installed, you do not need to check it). KDiff3 is used for revision history allowing you to see changes, merges, etc between 2 file states. I have yet to use this feature, but its nice to have if you are working on a repository with multiple users. It also doesn't hurt to install it anyways. Once you are finished, click next to start the installation process.

During the installation process, it will prompt you to select your language, and will install the selected components. I kept all the default settings and locations for the KDiff installation, but you are welcome to change them.

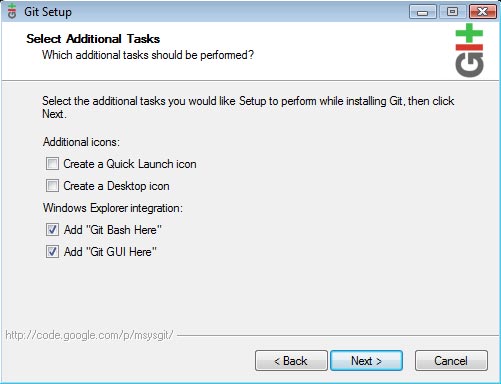
And finally, we get to install Git itself. You can just keep clicking "Next" to continue with the default installation. You will get to a screen with the options for "Add Git Bash Here" and "Add Git GUI Here". These settings add menus to your Windows Explorer right click menu, and will open up the CLI/GUI on the selected folder. They are not really mandatory, but its safe to keep them. The "Quick Launch" and "Desktop icon" checkboxes are not required, seeing as how we will never use Git stand-alone, but through GitExtensions, so you may uncheck them.

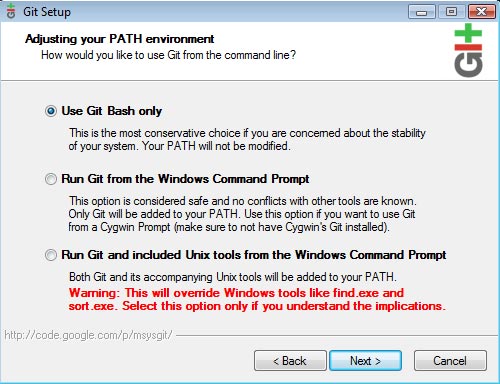
The next screen is important. You should keep "Use Git bash only" checked and not use the other options (unless you are familiar with these settings).

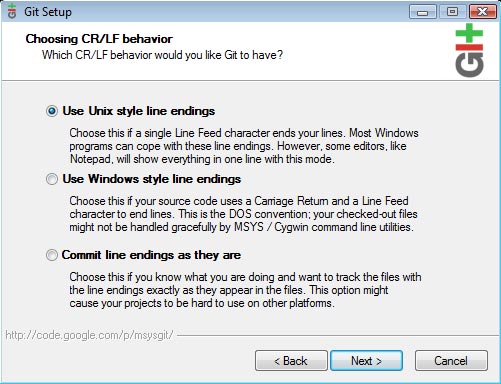
Git allows you to parse the correct line endings during each push. Personally I go with the "Unix style" line endings because my online servers are Linux boxes. These settings are entirely up to your environment, so choose which works best.

Completion

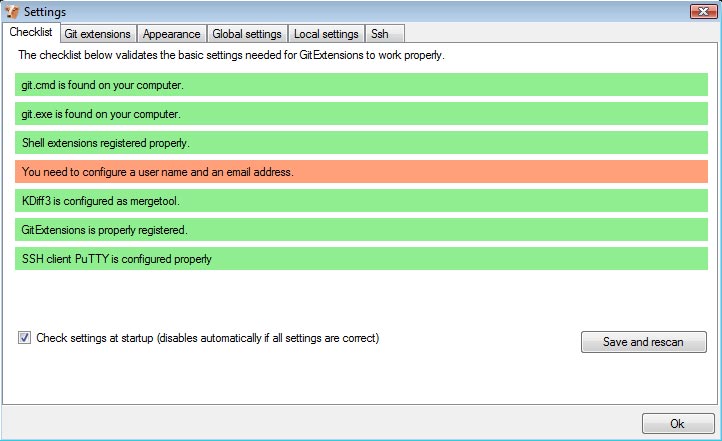
GitExtensions, alongside with MSysGit, KDiff and PuTTy should all be installed now. The next step is to launch GitExtensions and configure it to your needs. You should receive the following prompt.

All of the bars should be green if everything installed correctly, excluding the username/email bar. You will need to update the global settings with that information. You can do so by clicking on the orange bar, filling out the input fields and hitting OK. Once you have hit OK, you are finished, and a prompt will open up with buttons for "Open Repository", "Clone Repostory" and "Create Repository".

I hope this helped in your endeavor to use Git on Windows! I will discuss those 3 buttons in more detail within my next post. For the time being, everything should be installed correctly and you can begin messing around with GitExtensions. Enjoy!

Code snippets now available

So over the years I have written many small code snippets, functions and what have you, and thought it would be a good idea to release them to you guys. I use most of these snippets on my own projects and applications and are great to be re-usable everywhere. Most, if not all the snippets, will deal with PHP and Javascript, however I have thrown in some CakePHP and jQuery ones.

View all 21 code snippets

Ajax Handler

On top of releasing my code snippets, I have recently made my AjaxHandler component available. The component can be placed in any CakePHP application and then applied to specific controller actions to handle them as Ajax requests. The handler does nearly everything automatic and even responds with the correct data structure and content type.

Check it out and let me know what you think!

Download the Ajax Handler

Creating a simple debug() function

If you are ever like me and hate having to type print_r and echo pre blocks whenever you want to debug a variable or array, this function is for you! This is a global function that can be used to output any data that you need to debug and it comes equipped with some nifty features. For one thing, the debug() will not output any data on the website if error_reporting is turned off, which is good for instances where you forget to remove the debug() code! It will also display the file and line number where the debug() was called, and you can pass true as the second argument to do a var_dump instead of print_r. Here's the code for your enjoyment!

/**
 * Outputs/Debugs a variable and shows where it was called from
 *
 * @param mixed $var
 * @param boolean $dump
 * @param boolean $backtrace
 * @return string
 */
public function debug($var, $dump = false, $backtrace = true) {
	if (error_reporting() > 0) {
		if ($backtrace) {
			$calledFrom = debug_backtrace();
			echo '<strong>' . trim(str_replace($_SERVER['DOCUMENT_ROOT'], '', $calledFrom[0]['file'])) . '</strong> (line <strong>' . $calledFrom[0]['line'] . '</strong>)';
		}
		echo '<pre class="debug">';
		$function = ($dump) ? 'var_dump' : 'print_r';
		$function($var);
		echo '</pre>';
	}
}

Please note that this is a very basic debug function with very basic backtrace functionality. Here are a few examples on how to use the function (if for some reason you don't understand it).

debug($_SERVER);
// var_dump() instead of print_r()
debug($_SERVER, true);
// Do not display the backtrace
debug($_SERVER, false, false);